 Atomic Orbitals — BackgroundAtomic Orbitals — Background
In Quantum mechanics, the state of any physical system (in this case, a single electron bound to a charged nucleus) is completely described by its wave function. The wave function is obtained as a solution of a differential equation known as the Schrödinger equation. The set of possible orbital states of the electron (the “orbitals,” as they are commonly called) is simply the set of solutions to the Schrödinger equation for the given system.
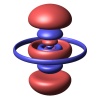
On the quantum scale, a particle does not usually have anything like a precisely determined position in space. Rather, from the square of the wave function, we obtain a probability density function. Simply put, this function associates with every location in space a certain probability that we may find the particle in that location, at any instant in time. The behavior of the particle is not completely random: In some regions of space, it is much more likely to show up than in others.
What is shown in the images are isosurfaces of the probability density functions for each orbital state. That is, every point on the surface of the “blobs” we see has equal probability of the electron being observed at that point in space. The surfaces are determined such that half of the total probability is enclosed by them. In other words, if we could precisely measure the position of the electron at any point in time, about half of the time we would find it to be inside the volume enclosed by the “blobs,” and half of the time we would find it at a position outside.
They were generated using a custom-made ray tracer written in the Ada programming language. It is based upon the analytical solution of the Schrödinger equation for the special case of a “hydrogen-like atom,” i.e. an atom with a single electron orbiting the nucleus.
Implementing a ray tracer then boils down to two main problems: Find the point where a ray intersects with the surface we want to display, and determine the normal of the surface at that point. How this is done exactly depends on what kind of mathematical description we have for the object we are rendering. In this case, the description is the isosurface of a real-valued function, and we treat this function as a “black box” with no other (known or assumed) properties besides that we can compute its value at any desired point in 3-dimensional space. The program then applies some rather naïve numerical methods to solve the aforementioned two problems.
Once we have that in place, building a ray tracer is no rocket science: For each pixel, we apply the Phong reflection model to determine its color based on the surface normal, the position of the light source and a couple of configurable parameters.
In order to give the scene a “smooth” and natural look, some kind of anti-aliasing is required. My implementation uses a simple adaptive supersampling technique, which gives acceptable visual results at a relatively low computational cost. A description of the exact algorithm can be found here.
Apart from the basics, the software supports two additional features, both of which are pretty straight-forward to implement once you have the basics in place:
It was a pretty instructive exercise, and it was a fun thing to do. Besides, I consider the images to be of relatively high quality (at least, compared to the simple means with which they were generated), so looking at them gives me a certain feel of achievement. It may not be the most useful achievement, but it's still an achievement. :-)
From a practical perspective, I'm pretty sure the same results could have been obtained using POV-Ray or other existing ray tracers, with much smaller effort.
Currently, no. I'd love to publish it, but for now, I chose not to. The main reasons for this decision are the rather mediocre quality of the code as well as my lack of time to give support to users and answer questions about the software. I hope that at least code quality will improve some day, so stay tuned.
If you have a certain application in mind and need to generate customized images (like, other colors or resolutions), feel free to contact me, and I will try to provide the images you need, when time allows.
The images provided here are in the public domain. Feel free to use them for whatever you like, for fun and profit.
However, if you use the images for any purpose and you find them useful (or even just delightful), I'll be very happy if you drop me a note.
Author: Jan Andres <J@nAndr.es>